
| 일 | 월 | 화 | 수 | 목 | 금 | 토 |
|---|---|---|---|---|---|---|
| 1 | ||||||
| 2 | 3 | 4 | 5 | 6 | 7 | 8 |
| 9 | 10 | 11 | 12 | 13 | 14 | 15 |
| 16 | 17 | 18 | 19 | 20 | 21 | 22 |
| 23 | 24 | 25 | 26 | 27 | 28 | 29 |
| 30 | 31 |
- 2020년 정보처리기사 4회
- 2020년 일정
- 성적프로그램
- 필기
- 알고리즘
- Real MySQL
- 책리뷰
- git
- 주간회고
- 미니프로젝트
- Python
- jsp
- post
- 항해99
- hackerrank
- LeetCode
- 코드숨
- java
- Jackson
- Til
- If
- 회고
- 서평
- algorithms
- 뇌정리
- 정보처리기사
- 스터디
- 함수형 코딩
- 2020년 제4회 정보처리기사 필기 문제 분석
- sqldeveloper
- Today
- Total
조컴퓨터
HTTP 요청 데이터 본문
HTTP 요청 메시지를 통해 클라이언트에서 서버로 데이터를 전달하는 방법을 알아보자.
주로 다음 3가지 방법을 사용한다.
- GET - 쿼리 파라미터
- /url?username=hello&age=20
- 메시지 바디 없이, URL 의 쿼리 파라미터에 데이터를 포함해서 전달
- 예) 검색, 필터, 페이징 등에서 많이 사용하는 방식
*전체 파라미터 조회
@WebServlet(name = "requestParamServlet", urlPatterns = "/request-param")
public class RequestParamServlet extends HttpServlet {

    @Override
    protected void service(HttpServletRequest request, HttpServletResponse response)
            throws ServletException, IOException {

        // username=hello
        request.getParameterNames().asIterator()
                        .forEachRemaining(paramName -> System.out.println(paramName
                                + "=" + request.getParameter(paramName)));

    }
}
- POST - HTML Form
- content-type: application/x-www-form-urlencoded
- 메시지 바디에 쿼리 파라미터 형식으로 전달 username=hello&age=20
- 예) 회원 가입, 상품 주문, HTML Form 사용
*src/main/webapp/basic/hello-form.html 생성
<!DOCTYPE html>
<html>
<head>
    <meta charset="UTF-8">
    <title>Title</title>
</head>
<body>
<form action="/request-param" method="post">
    username: <input type="text" name="username" />
    age: <input type="text" name="age" />
    <button type="submit">전송</button>
</form>
</body>
</html>
실행해보자
http://localhost:8080/basic/hello-form.html
POST 의 HTML Form 을 전송하면 웹 브라우저는 다음 형식으로 HTML 메시지를 만든다. (웹 브라우저 개발자 모드 F12 확인)
- 요청 URL: http://localhost:8080/request-param
- content-type: application/x-www-form-urlencoded
- message body: username=hello&age=20
application/x-www-form-urlencoded 형식은 앞서 GET 에서 살펴본 쿼리 파라미터 형식과 같다. 따라서 쿼리 파라미터 조회 메서드를 그대로 사용하면 된다.
클라이언트(웹 브라우저) 입장에서는 두 방식에 차이가 있지만, 서버 입장에서는 둘의 형식이 동일하므로 request.getParameter() 로 편리하게 구분없이 조회할 수 있다.
정리하면 request.getParameter() 는 GET URL 쿼리 파라미터 형식도 지원하고, POST HTML Form 형식도 지원한다.
- HTTP message body 에 데이터를 직접 담아서 요청
- HTTP API 에서 주로 사용, JSON, XML, TEXT
- 데이터 형식은 주로 JSON 사용
- POST, PUT, PATCH
HTTP 요청 데이터 - API 메시지 바디 - 단순 텍스트
- 먼저 가장 단순한 텍스트 메시지를 HTTP 메시지 바디에 담아서 전송하고, 읽어보자. (HTML Form 이 아닌 형태)
- HTTP 메시지 바디의 데이터를 InputStream 을 사용해서 직접 읽을 수 있다.
*RequestBodyStringServlet
@WebServlet(name = "requestBodyStringServlet", urlPatterns = "/request-body-string")
public class RequestBodyStringServlet extends HttpServlet {

    @Override
    protected void service(HttpServletRequest request, HttpServletResponse response)
            throws ServletException, IOException {
        ServletInputStream inputStream = request.getInputStream();
        String messageBody = StreamUtils.copyToString(inputStream, StandardCharsets.UTF_8);

        System.out.println("messageBody = " + messageBody);

        response.getWriter().write("ok");
    }
}
HTTP Request 로 넘어온 파라미터 중 일부 값들은 getParameter() 나 getParameterValues() 로 읽을 수 없는 경우가 있다.
POST 메서드를 사용하면서 Content-Type 이 text/plain, application/json 등의 형식일 때 발생하는데, 이를 RequestBody Post Data 라 하면서* 이러한 값은 Request.getInputStream() 혹은 Request.getReader() 를 통해 직접 읽어야 한다.
*RequestBody Post Data 검색되지 않음.
*StreamUtils
Simple utility methods for dealing with streams. The copy methods of this class are similar to those defined in FileCopyUtils except that all affected streams are left open when done. All copy methods use a block size of 4096 bytes.
Mainly for use within the framework, but also useful for application code.
-> Class StreamUtils 는 스트림을 처리하기 위한 유틸리티 메서드이다.
**copyToString: 주어진 InputStream 의 내용을 문자열로 복사하는 역할.
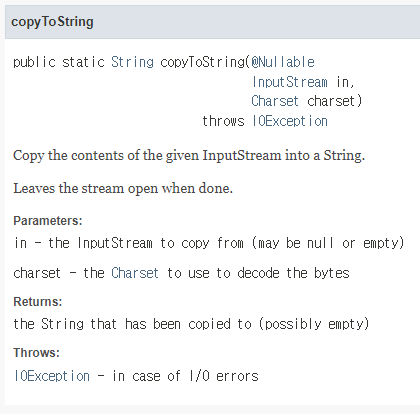
***StandardCharsets.UTF_8: InputStream 은 byte 코드를 반환하기 때문에 우리가 읽을 수 있는 문자(String) 형태로 확인하기 위해서는 문자표(Charset) 를 지정해 주어야 한다.
해당 코드가 잘 작동하는지 확인을 위해 Postman 을 사용해서 테스트 해보자.
- POST http://localhost:8080/request-body-string
- content-type: text/plain
- message body: hello!
- 결과: messageBody = hello!
HTTP 요청 데이터 - API 메시지 바디 - JSON
JSON 형식으로 파싱할 수 있는 객체를 먼저 하나 만든다.
@Getter @Setter 형식 username, age
*RequestBodyJsonServlet
@WebServlet(name = "requestBodyJsonServlet", urlPatterns = "/request-body-json")
public class RequestBodyJsonServlet extends HttpServlet {

    private ObjectMapper objectMapper = new ObjectMapper();

    @Override
    protected void service(HttpServletRequest request, HttpServletResponse response)
            throws ServletException, IOException {
        ServletInputStream inputStream = request.getInputStream();
        String messageBody = StreamUtils.copyToString(inputStream, StandardCharsets.UTF_8);

        System.out.println("messageBody = " + messageBody);
        HelloData helloData = objectMapper.readValue(messageBody, HelloData.class);

        System.out.println("username = " + helloData.getUsername());
        System.out.println("age = " + helloData.getAge());

        response.getWriter().write("ok");
    }
}
해당 코드가 잘 작동하는지 확인을 위해 Postman 을 사용해서 테스트 해보자.
- POST http://localhost:8080/request-body-json
- content-type: application/json
- message body: {"username": "hello", "age": 20}
- 결과:
messageBody = {"username": "hello", "age": 20}
username = hello
age = 20
*Jackson 라이브러리 ObjectMapper:
코드에서 사용한 기능 readValue() 로 Convert "JSON" to "Java Object" 기능을 활용한 것이다.
Jackson 라이브러리에 관한 기능은 이 분의 게시글을 참고했다.
참고)
1. 김영한 님의 '스프링 MVC 1편 - 백엔드 웹 개발 핵심'에서 HTTP 요청 데이터 - 개요
2. 서블릿에서 post body를 어떻게 읽는가? (tistory.com)
서블릿에서 post body를 어떻게 읽는가?
고객사에서 웹로직에서 제우스로 전환하는데 아래와 같은 상황에 대한 버그 리포트가 있었다. filter에서 request.getParameter()를 호출. filter는 /* 로 매핑이 되어있어 무조건 타게 되어 있음. servlet에
jongqui.tistory.com
3. 서블릿에서 HTTP Request Body 읽기 (tistory.com)
서블릿에서 HTTP Request Body 읽기
서블릿에서 HTTP Request Body 읽기 HTTP Request로 넘어온 값들 중 일부는 getParameter()나 getParameterValues()로 읽을 수 없는 경우가 있다. POST 메서드를 사용하면서 CONTENT-TYPE이 "application/json..
kwonyang.tistory.com
4. ServletRequest (Java(TM) EE 7 Specification APIs) (oracle.com)
ServletRequest (Java(TM) EE 7 Specification APIs)
Stores an attribute in this request. Attributes are reset between requests. This method is most often used in conjunction with RequestDispatcher. Attribute names should follow the same conventions as package names. Names beginning with java.*, javax.*, and
docs.oracle.com
5. StreamUtils (Spring Framework 5.3.15 API)
StreamUtils (Spring Framework 5.3.15 API)
Copy a range of content of the given InputStream to the given OutputStream. If the specified range exceeds the length of the InputStream, this copies up to the end of the stream and returns the actual number of copied bytes. Leaves both streams open when d
docs.spring.io
6. Jackson ObjectMapper 정리 (tistory.com)
Jackson ObjectMapper 정리
개요 Java 개발자라면 Jackson에서 제공하는 ObjectMapper와 자주 마주치게 됩니다. Java 클래스 내용을 확인하거나 내용물의 Parsing 과정에 필요한 커스터마이징이 존재하기 때문입니다. 물론 중요한 기
interconnection.tistory.com
'공부 > Spring' 카테고리의 다른 글
| 기본 생성자를 선언하는 이유 (0) | 2022.01.25 |
|---|---|
| HTTP 응답 데이터 (0) | 2022.01.25 |
| 쓰레드 풀 (0) | 2022.01.24 |
| 서블릿 컨테이너(WAS) (0) | 2022.01.24 |
| Bean Scope - singleton, prototype, request (0) | 2022.01.22 |
